Archive | The Bathroom RSS feed for this section

Lips, lintels and lights!

15 Apr

So now why is it that if I’m going to do anything dippy or silly in my DIY endeavours, IB is always around? (or hunky boiler man who may be coming back next month to do some more work for us, I might move out for the week!) Given how much time I spend home alone it just doesn’t seem fair.  Yesterday for example, I managed to give myself a fat lip whilst wrestling some old curtains (what else, curtains have been a source of torment for me one way or another since we moved in!) off a wide white, highly bendy old curtain track! I was tugging downwards very hard on the curtain to get one particularly stubborn hook off the track and as the curtain hook and track parted company, the track snapped back up right into my face, with my top lip taking most of the force. One cold cloth and fat lip later, I had to explain to IB what had happened and instead of sympathy I got an afternoon of curtain related jokes! See if it had happened on a week day, he wouldn’t have been home till the evening, by which time the swelling would have gone down and IB would have been none the wiser!

Anyway, on a more positive note, things are progressing well in the bathroom, guest room and living room. In the guest room, DIY dad has managed to turn the room a more acceptable shade of yellow with his half white emulsion, half Dulux hazy daze mixture. The walls are now more of a pale morning sunlight colour rather than full-on, I’m standing in the mid-day sun yellow.  The woodwork still needs painting and the door has to be changed, but already it feels like a very different room to when we started out.

do it yourself blog guest room

Meanwhile in the bathroom, IB has put up the new mirror. He finally tracked down the mirror of his dreams –on ebay last week,  one with a shaver socket AND a light.

do it yourself blog bathroom mirro

I have to admit, even though I wasn’t keen on the whole modern mirror idea – you may recall I wanted something framed with a bit more character – it does look quite good.  The little silver disc protrusion at the top is actually the light which is controlled by a little sensor at the base of the mirror that you wave your hand under to turn the light on.  Very Star Trekesque!

Back downstairs in the living room, DIY dad was very busy on Friday putting up curtain poles. It took a lot longer than planned, as has been the case with so many of the projects (big and small) we’ve undertaken to date. In this case it was because for both windows, in order to put the brackets for the curtain poles in the right spot, DIY dad had to drill holes into the supporting lintels. Four broken drill bits, several hours, and a number of expletives later, he was done! For the first hour after they went up, IB and I weren’t entirely convinced we’d made the right choice with the pattern and colour, but I think we’d just got so used to the purple sheet and sticky tape look that it took us a while to adjust to having real curtains up.

do it yourself blog

Front window

do it yourself blog French doors

French doors

Finally, this week, I’ve discovered a brilliant website called housetohome.co.uk. It covers every room in the house and for each one offers lots of different photos of layout/decorating options. So for example for kitchens, it has sections filled with photos and advice on country kitchens, L-shaped kitchens, modern kitchens and there’s even a section on ‘handleless’ kitchens! It also offers a great ‘how to’ section that includes advice on how to save money on DIY which I’m off to read now!

The joy of paint!

8 Apr

So, its confession time – I’ve allowed myself to get distracted from my DIY duties this week. My mum’s been visiting and she and I have mostly been shopping rather than DIYing!  Then of course today there was Easter lunch to be cooked and how else are you going to spend Easter Sunday afternoon but eating chocolate?! Still IB and DIY dad have been hard at it all week. IB’s had the week off work and has used the time to finish all the last bits and pieces in the bathroom, like fixing the shower so that it sprays cold water AS WELL AS hot, cutting the top drawer of the sink unit so that it can fit around the waste pipe, painting the new skirting board etc, etc. I’m particularly impressed with the job they’ve done on the drawer as it not only needed a piece cut out of it for the pipe but a new ‘wall’ had to be created so that we could still use the drawer for storage.

do it yourself blog Carpentry

Look at that u-shape, its carpentry art!

do it yourself blog The finished product

When one drawer closes...

IB’s also put up the new shower curtain which finally arrived this week. This house had no shower when we moved in, well unless you count this little device which was set up above the sunken bath:

do it yourself blog - Our temporary Shower

Our so-called shower for the last four months!

It was impossible to control the temperature, so you could either have a very cold shower or a very hot one. Actually I use the term shower loosely as it barely gave out a trickle of water and so didn’t get used for anything but hair washing. Anyway, there was great excitement on Thursday when the new shower was officially declared open for business!

do it yourself blog - New shower

The new shower

IB has also been trying this week to track down curtain poles for the living room as well as a bunch of new doors and door handles. A lot of our doors are quite flimsy and the metal handles have blackened badly with age. In his hunt for online bargains, IB’s come across a couple of interestingly titled sites, like justpoles.com, which sounds like an online dating site for Polish people and lovehandles.com which you might expect in true Graham Norton fashion to be full of pictures of people’s overflowing midriffs, however, it’s actually  a site that sells door handles!

When not eating chocolate and wandering around the shops with my mum, I’ve been ruminating about how best to ‘dress’ our newly painted living room. There’s been a slight blip in the sense that the colour we painted the room is looking more ‘lavender’ than ‘blush pink’ (which was meant to be our attempt to escape all the neutral shades we favoured in our last house) but luckily it will still go with the curtains we’ve bought. But plans for cushions, lampshades and carpets might need revising. This has been just one of the painting challenges this week as the “creamy yellow we painted the guest room proved – even with just one coat – to be more blindingly yellow than cream. I sort of liked it but IB is insisting it’s too yellow and sunglasses are required on entry. So next week I’ve got to repaint it! I’d post a picture of it but truly I’m afraid it might damage your eyes!!!

Bathrooms a go go………..well almost!

1 Apr

Well as of 4 o’clock this afternoon, the bathroom is 90% complete! Can you believe it, because I’m not sure we can. We’ve just been standing in the doorway of the bathroom trying to take it all in and grinning at each other like crazy people the whole time. All the individual elements that we bought from different shops/online stores over the last two months, the bath, the sink and oak unit, the floor tiles, the wall tiles, the shower ring, the filler taps, we hoped they would all go together, we THOUGHT they would all go together but we couldn’t be totally positive until they were all actually installed. We never wanted a catalogue bathroom. We were always striving for something unique that reflected our tastes and even though it’s not quite finished, we’re both agreed that’s what we’ve got. There’s still a few things left for our bathroom guys to finish off, like:

1. the nuts and bolts that screw the toilet to the floor were missing from the kit that came with the toilet, so that can’t be properly attached yet, although it’s all set up and ready to go. Yesterday there was a bit of a crisis because the old waste pipe needed to be cut back a bit to accommodate the new toilet.

do it yourself blog Waste Pipe


However when the bathroom guys went to cut it, they found it was made from lead (as waste pipes from the 1950s are inclined to be!) and so they blunted their hacksaw! Anyway they pitched up today with industrial strength cutting equipment and the jobs done!

2.Tthe bath is in position but isn’t bolted down and we’re waiting for the pop up plug which is on order and due to arrive on Tuesday.

3. The tiler has left too big a gap for the filer tap for the bath so that tile needs to be redone.


But our bathroom guys have promised us by the end of Saturday afternoon, the bathroom will be up and running! Some bits of paintwork still needs touching up or redoing, so its out with the brilliant white again for me! But other than that all we have to take care of is the finishing touches like the mirror, the light switch and a new door! Easy!! Well easier!

So here it is, where once we had this:

Old bath


Now we have this:

do it yourself blog

New bath!


And where once we had this:

do it yourself blog

Old bathroom unit


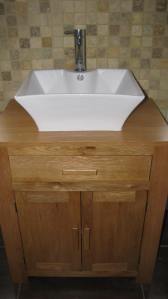
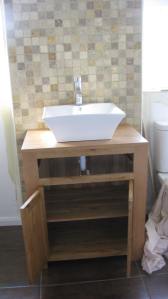
Now we have this:

do it yourself blog

New cabinet, minus the drawer!


Oh and just to give you a sense of what the tiles look like……………………………..


do it yourself blog


Anyway, roll on next weekend!

DIY Dads

25 Mar

So what does every DIY Dame need when faced with a massive house renovation project (apart from a lottery win)? Answer a DIY Dad, who after a couple of years spent in retirement has now finished all the little jobs that he needed to do in his own house and so is happy to come and help a daughter in DIY distress. My DIY dad landed in at 2pm and already he and IB have started to work on putting up the coving in living room. So we’ve gone from this:


do it yourself blog No Coving

No Coving!


To this:

do it yourself blog Coving

First piece of coving in place!


My dad’s going to prime the walls next week and then paint them, then sand and paint the skirting boards and the doors, then there’s the curtain poles to put up……………… I’m not sure if he realises how long a list we’ve got for him, but he is stopping for about three weeks and as long as we feed him lots of nice food and more importantly puddings (his is a lover of apple pie and treacle sponge) I know he’ll happily work his way through it.

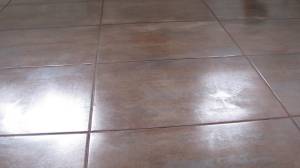
So, what else has been happening over the weekend? Well in terms of correcting last week’s painting disaster in the bathroom, IB has now sanded down the walls so they are all ready for me to repaint tomorrow (hunky plumber man is not due round for ANY reason, so I think I’m good to go). I would have repainted them over the weekend but I’m happy to report that I couldn’t get into the bathroom over the weekend as our builder K. and plumber K. were busy working in there. All the new plumbing and pipework  is now securely in place, the awful chunky pink water-pipe has been boxed in and best news of all……………………. the floor tiles are down! As I type the grouting is drying which is just as well as it’s quite a dark brown, pretty much the same colour as the tiles. When IB called me into the bathroom earlier to show me, the first thing I said was that the floor looked like a giant bar of Dairy Milk – well what would you say when confronted with this………………..


do it yourself blog My giant bar of Cadbury's Dairy Milk

My giant bar of Cadbury's Dairy Milk!


do it yourself blog Floor Tiiles


IB rolled his eyes and told me I’m obsessed. He does have a point I suppose, I do talk about chocolate A LOT and think about {eating} it even more and having a bathroom floor that looks like a chocolate bar is not going to help my addiction!  Even just writing these words is reminding me of the bar of dark chocolate and raspberries (from Divine) that my friend who came to tea last week brought for me. Actually I think there might be a few squares left……………………………. Anyway as long as the grout does dry a few shades lighter than the tiles, the chocolate effect should pass and my addiction will be contained!

The other thing I wanted to mention, only because anyone following my blog will know what a big deal this is for me, as of Friday afternoon, I am the proud and content owner of living room CURTAINS!!! Hurrah! I found them last week  but before I bought them I wanted to make sure they would work in the living room, but the shop didn’t have any swatches/samples for me to borrow so I had to buy the matching cushion cover. When I took it to the til to pay, I had a bit of a shock. The cushion cover (JUST the cushion cover, there was no cushion inside!) was twenty-three pounds! Twenty three pounds for ONE cushion cover, and it wasn’t even a top of the range cushion cover or a designer one. Now I’ve checked with a few friends and I am definitely not the only one who is shocked by this. Twenty three pounds for two squares of material sewn together with a zip down one side seems a little over the top to me, especially when you typically need four to six of them for a sofa. I wish somebody had told me  when I was a little girl how lucrative the cushion cover industry is! Anyway if I manage to nail the curtain making thing (which I’m planning to try for the guest bedroom), then I’m sure I can crack cushion covers. We’ll make a saving and I might just have a new career in the pipeline!

In search of the DIY gods!

23 Mar

So the DIY gods have definitely NOT been smiling down on me this week. First of all, who knew that you have to water down primer by 30-50%? NOT ME. Or IB for that matter. Or even the manufacturers it seems as there is nothing written on the side of the tin of primer to that effect. Putting primer on the bathroom wall was a real pain it  was so thick and gloopy and came out in streaks, turning the lovely smooth freshly plastered walls into a bumpy, cratered mess.  I thought it was because we had used an own-brand primer rather than one from Dulux or Crown. We actually only found out about the importance of adding water to primer because I told IB when I finished coating the bathroom, that there was no way I was using the same primer again. Now the problem with this of course, was that we had bought a huge tin of the stuff, big enough to do the bathroom, guest room and the living room. Horrified that I might be suggesting we chuck two-thirds of a can of primer away (and forgive me, I’m not usually so wasteful, but I figured it was better to waste a little bit of money than a lot of my time!) he called a painter-decorator friend of his for advice. C., one of the smiliest men I have ever met who wears proper white painters dungarees (which mysteriously are always super white and devoid of any tell-tale paint stains not like my painting clothes!) told IB that primer should definitely be watered down by up to fifty percent. So should you ever find yourself in the position of having to prime plaster, take note, it’s SO much easier a job if you heed this advice. Apparently the idea is that the primer seals the plaster and gets absorbed straight into the wall as you paint it on (which it does really quickly so be careful, you have only seconds to correct any mistakes!) .

doityourselfblog

If you look very closely, you'll see the streaks and blobs from non-watered down primer

doityourselfblog How primer should look

How primer should look when applied

Anyway, the second disaster was also in the bathroom. Having declared in my last blog that I had finished  painting this room, I decided that very day that it needed another coat of paint. But unfortunately half way through putting it on, I ran out of paint. So, I texted IB and asked him to pick up some on his way  home. I was very specific with my instructions, Brilliant White Emulsion by Crown please. IB duly returned home with a large tin of Brilliant White by Wicks. I was a bit wary of finishing the room off with a different brand of paint. But it was late and the store had closed and IB assured me that Brilliant White is Brilliant White, so on I went and finished painting at about 10 o’clock on Wednesday night. IB and I even had a celebrity glass of wine when I was done. We were basking in a glow of satisfaction as we held up a (soon to be laid) floor tile against the white walls and declared that Brilliant White was indeed the right choice for the walls. It was only as I was brushing my teeth later on that I heard IB call my name in that special tone your partner reserves to let you know that something is wrong. What had happened? Well it turns out half the bathroom is now painted in Brilliant White MATT emulsion from Crown and the other half in Soft Sheen  from Wicks and YES, you can tell the difference. So guess what we’re doing this weekend? Sanding it all down and starting again…………………………….

Oh and the week didn’t really get any better after that. Remember how I declared on Tuesday that I would  not be doing any painting on Friday as hunky plumber man (who I’ve decided looks a bit like a rugged Ryan Gosling) was coming round and I wanted to ensure this time that he didn’t have to witness me wrestling with the roller or worse!  Well guess who came by a day early to fit the shower pump? And guess who’s husband didn’t pick up the  text that notified us of this early arrival?  And guess who had just tried to apply the watered down primer to the guest bedroom wall with a roller – which I can now say with some confidence is not a good idea, always use a brush  – splattering her face and hair quite liberally in the process? When the doorbell rang I must admit I did peep out an upstairs window to see if I could get away with not opening it, but when I saw hunky plumber man’s van I knew I had no choice. So once again I had to watch him walk up our stairs, head bent, a big grin on his face! It’s such a good job I’m not single and trying to impress him!!!

In the absence of a picture of hunky plumber, thought I would include this one of Mr. Gosling – can’t think why!

To end on a positive note though (as if this photo wasn’t enough!), this week I christened the cake stand, with a delicious Mary Berry coffee and walnut cake – a recipe I adore because you just throw everything in a bowl and mix it all together, yet it always tastes like you made so much effort. Maybe I should paint less and bake more……………..

doityourselfblog Coffee and Walnut Cake

Tah Dah!

doityourselfblog cake-stand

And this time with the dome on!

The importance of contingency funds and other worldly DIY advice!

16 Mar

So, if you read this blog on Monday, you’ll now be expecting to see pictures of our new bathroom tiles in place. Well the disappointing news is that the tiling is on hold (well actually everything has come grinding to a halt!) because the plumbing for the new filler tap is still proving a challenge. Although, the beehive hole is gone and the pipework is now boxed in……………………..

doityourselfblog Where the beehive once was

Hive out, bricks in

doityourselfblog No more pipes!

Where have all the pink pipes gone?

But basically the hot water is still dribbling rather than gushing out of the filler tap  (and shower) and nothing can move forward till its fixed. IB has now resorted to contacting hunky plumber man for his advice and he has suggested that if we fit a ring system and pump for each bathroom then that should overcome the problem. Apparently the new filler tap is currently plumbed into the main water system rather than the hot water tank and so the water pressure isn’t as strong as it should be.  We could fit one pump and that would solve the problem but it would also mean that when both showers/baths are in use, then only one person would get good water pressure, so each bathroom ideally needs its own pump……. Still following? Good. Because the upshot of all this of course is that we are now faced with an unplanned for expense, so we’re likely to go over budget on our first room! Now I have heard the advice on a zillion TV programmes about the importance of a contingency fund but I was always slightly suspicious of the whole idea. I figured if you project plan carefully you will know in advance what tools/materials/expert labour you will need for renovating any room and can budget accordingly. I’ve even been arrogant enough to think that we won’t spend our contingency fund because our planning has been so careful and thorough, luckily I hadn’t got as far as planning what we might do with any unspent money (well except for a tiny bit of day dreaming about a holiday somewhere hot and sunny to celebrate the house being finished).

Anyway I’m now starting to panic that the bathroom won’t be ready for Easter which is a bit of a downer as my parents are coming to stay for a week. With no shower and only one (sunken) bath it’s going to make the mornings fun, NOT! I think a bath rota pinned to the fridge might be a necessary step! The other thing is with Easter so close I better get cracking on the guest bedroom next week which is still in its raw post plastered state! That’s another mood board that needs to get underway this weekend! Maybe I can distract my parents from our lack of shower facilities with a really nice bedroom to sleep in! But before I can start on the guest room, I MUST finish painting the bathroom today otherwise I’m going to fall behind schedule. Speaking of which, IB bought me the most fantastic gift last weekend, not diamonds, not shoes, not even chocolate, but this baby………………………..

doityourselfblog New Roller

My new DIY toy!

It’s an extension arm for my roller and OMG I’m in love! Maybe it’s a consequence of living my life so far below the clouds at a weeny 5 foot 2, inches which means that ANYTHING -not just high heels – that helps me to reach places that other grown-ups can is always going to bring me joy. Seriously though, putting the primer on the ceiling with just the roller and a step ladder was ok but having the extension arm meant I put the first coat of paint on with NO need for the ladder and I did it in half the time. I’m actually looking forward to painting today because I get to take the extension arm out again……I wonder if they come in other colours……………………….

By the way the curtain saga lingers on, only there is now finally light at the end of the tunnel/window, thanks to my sister-in-law, who having read my blog earlier this week emailed me to share the curtain solution she’d recently stumbled on (thanks in turn to her sister-in-law). Apparently, and forgive me if you already know this, but tucked away in various corners of the retail world, are discount fabric shops, where you an source curtain material and even in some cases get your curtains made up to your specifications. And they are not as I assumed filled with discounted fabrics of the kind no one except those rare creatures with a fondness for 1970s poly-cotton and acrylic would appreciate. They also carry scrummy ‘posh’ fabrics (as my sis-in-law calls them) and they are significantly cheaper than usual retail prices. She snagged herself some material that is currently featured on the front page of Country Living mag (Trailing Oak leaf by Voyager)   which normally retails at £37.50 per m, but she got it for only £21 per metre! So guess where I’m off to this weekend? Hopefully I’ll have good curtain news for you next week!

Weekend woes

12 Mar

OK so the good news is that we have FINALLY chosen new bathroom tiles.  IB brought home three samples yesterday and I must say it was hard to choose between the three of them as they all could have worked with the wall tiles. However, in the end, once we put them next to the oak dresser we bought for the sink, there was one definite winner which I will be able to show you photos of in situ I hope by the end of Thursday evening. Essentially, they’re a medium brown with a faint metallic sheen (hence they come from the Metallik range at Topps Tiles) and they contrast really well with both the wall tiles and the oak bathroom cabinet we bought recently on ebay.  Actually I have to admit that I’ve developed a bit of an addiction to oak furniture. I’ve always loved wood. When we first got married pine was very much in fashion and we filled our little flat with it. We had pine book cases, a pine bedstead, a pine wardrobe, a pine bread bin…… you name it. The only survivors from that era (we have been married nearly 13 years) is the bedstead and one wardrobe but they’re both on their last legs, although they’ll have to do for a while longer. We’re only buying essential new furniture at the moment. In part because we need to see how our budget survives the bathroom and kitchen renovations and in part because we’ve agreed that we shouldn’t rush into buying stuff for a room until we’re actually working on it. Although if we do happen to spot an absolute bargain…………..

I know I’ve said it before but the curtains are still defeating me. Although now we’ve decided to go for roman blinds in the boy’s room, where we are currently using brown paper on the windows as a temporary measure – the boys have taken to doodling on it from time to time! I’ve just sent off for six colour samples from the 247 curtains website.  They should be here tomorrow so fingers crossed, one of them will inspire us. The trouble is with that room we are doing things the wrong way around, so out of necessity we’re having to choose new blinds even though we haven’t starting renovating the room yet! In the meantime I’ve also chickened out of making the curtains for the living room (remember how my friend H. offered to teach me?) largely because every visitor we ever have will see those curtains and I really don’t think my sewing is up to such scrutiny (to give you some insight, when my eldest son started school I sewed name badges on all his clothes, but they all fell off after the first wash!  On Friday I went to town to try and buy some living room curtains but after two hours I got curtain fatigue and ended up coming home (but not before I’d popped into a discount day in one of the department stores and unintentionally bought a cute blue cardigan – why are clothes so much easier to buy than curtains?!?).

But back to the bathroom because even though we’re over our tiles crisis, there’s another one looming. Things had been progressing nicely at the weekend. On Saturday our two smiley bathroom fitters put our funky new shower fitting in and attached the circular shower rail to the ceiling. Even without the bath in place we could see that things were coming together nicely.

doityourselfblog New shower fittings

New shower and shower rail

Yesterday though the fitters hit a snag. They put the lovely new shiny free standing taps in position only to find that the water pressure for the hot tap was way too low and there seemed to be no obvious cause. At worst this means the taps just won’t work with our plumbing system and at best that there is some simple but not obvious fix that will make them work. Anyway IB is on the case. He’s been online and made some phone calls including one to the tap manufacturer so fingers crossed by the next time I write, all will be well in tapworld!

doityourselfblog New Bath Taps

The offending tap!

Primer, primer everywhere!

8 Mar

OK I know I’ve been working hard on my DIY activities because I’ve got actual blisters on the palm of my hand from holding the paint roller, as well as ingrained paint marks streaked across my nails! This week alone I’ve managed to completely coat the bathroom ceiling and walls (including the tricky bits round the windows) in primer.  Not bad going considering I’ve only got mornings free to paint. As of two o’clock this afternoon things moved up a notch as I finished covering the ceiling in a coat of white emulsion. I was hoping that unlike all the women I know, it would be fine with just one coat, mainly because I can’t seem to paint ceilings without getting serious splashback in my eyes and on my hair and face. Unfortunately however, the tiler has been round this afternoon, finishing the grouting on the tiles on the back wall of the bathroom and so now there’s a four inch deep grouting stain along the length of my lovely white ceiling!


do it yourself blog Grouting on Newly painted ceiling

My grouted ceiling!


The tiles don’t look at their best in this pic as they’re still coated in grout which can’t be cleaned off for 24 hours. Speaking of tiles, we had a major crisis last night when the first half of the wall was tiled because it didn’t take an interior designer to see that the floor tiles that we’d bought were not going to work with these wall tiles. They had seemed fine together in the shop but with the wall tiles up, the floor tiles looked more clashing than complimentary. So back the floor tiles went today. IB was not impressed having only moved all 25 packs up the stairs from the hallway at the weekend, he now had to take them back down the stairs and out to the car, then out of the car and back into the shop again. Well he’s always wanted a six pack!

Anyway, now we have to go tile shopping again which I hate so much.  As this experience shows, we’re not the greatest at envisaging how well things will go together once they’re in situ! Although I guess this time it’ll be easier to pick the right floor tile because the bathroom has progressed so far and we can just bring a couple of samples home and try them out against the tiled wall.

The other thing we need to sort out is the bathroom mirror and unfortunately we fundamentally disagree on what we want for the room and I don’t think even a mood board will sort this one out. IB is keen on having something functional, something with built in lighting and a discreetly hidden shaver point, along the lines of this. I on the other having flicked through my mags for inspiration, want something more individual and full of character, something which doesn’t scream ‘mass produced bathroom mirror’, something more like this. I’m not sure this one’s worth the fight…… I might just give way and score some major brownie points which I’ll can cash in at some stage in the not too distant future…………


Paint rollers, primer and a ladder!

6 Mar

Does everyone except me know that roller sleeves slide on to paint rollers, straight over the two black rings on the roller arm, which are there apparently to lock the roller sleeve in place once it’s on. IB reckons the whole world knows this and he also reckons the fact that I spent fifteen minutes this morning trying to remove the black rings BEFORE sliding the sleeve onto the roller arm is a good enough reason to change the name of this blog to ‘dippy’ diy decorating dame! And you know the saddest part of this tale? The person who put me right about the whole fleecy sleeve, black ring issue was hunky boiler man. Remember him? The tallest (and most sombre!) tradesman to cross this threshold to date. Well he was back today to address a couple of blips we’ve had with the new boiler and so frustrated was I in my battle to get the black ring off the roller arm that  I stopped him en route to the hotpress and asked for his help. ‘Eh I think this bit is meant to go over the ring’ he said, slipping the fleecy sleeve on to the roller arm with one deft flick of the hand . And as the sound of the black rings locking into place filled the air, he turned back up the stairs, head bent, but the grin on his face clearly visible! We might have to find ourselves another plumber……..

do it yourself blog eiydecoratingdame.wordpress.com Paint Roller

Anyway, once I’d got my roller righted, I was off. Paint tray filled with primer,  rags at the ready, brushes in a jar of water and up the ladder to paint the bathroom ceiling.

do it yourself blog eiydecoratingdame.wordpress.com The Dame is ready to paint

The Dame is ready to paint!

do it yourself blog eiydecoratingdame.wordpress.com Plastered Ceiling

Ceiling post plastering

Now I KNOW we’ve just had the living room plastered, but we have I confess broken the golden decorating rule of never starting more than one room at a time. The reason for this? Well, firstly it made good sense financially to have more than one room plastered at a time (we had three done in total but more about that another time), secondly we both were desperate to have one decent bathroom in the house, and thirdly the guys who we wanted to use could fit us in end February/early March. They’re fitting us in around another job so they’re working weekends only. They started work two weekends ago and in that time they’ve ripped out this…………

do it yourself blog eiydecoratingdame.wordpress.com Pink Paisley Bath

Shield your eyes!

And this……..

do it yourself blog eiydecoratingdame.wordpress.com Pink Sink

Matching pink sink!

As well as the hideous pale grey tiles adorning the walls and the pink shag pile carpet that was on the floor. Along the way they’ve discovered some very interesting pipework under the floorboards which led them to spending a day longer on the replumbing than they anticipated. They also found that the tiles were CEMENTED on to the walls, which led to a few expletives and the use of a jack hammer to get them off. Much to the excitement of the kids, there was then a David Attenborough moment when they discovered a wasp’s nest (no longer operational thankfully) behind one of the air vents!

do it yourself blog eiydecoratingdame.wordpress.com Wasps Nest

Maybe all that pink just got too much for the wasps!

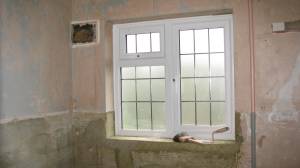
Anyway by the time the plasterer came, the room was a barren map of exposed brickwork, striped walls and protruding pipes with little to recommend it other than the newly fitted spotlights and fancy radiator, but even that got removed in readiness for plastering.

do it yourself blog eiydecoratingdame.wordpress.com Barren Bathroom

Wasps apartment was in that gap on the top left.

Now the plaster is finally dry, its my job to make sure as much of the painting as possible is done before Saturday when the floor tiles go down. By the early afternoon I’d managed to cover the ceiling and half the walls in primer. It’s not as easy as it looks given how thick and gloopy the primer is you have to lean really hard on the roller to get even coverage.  It also didn’t help that my paint tray is way too big to rest on the top step of the ladder so I had to keep getting up and down to replenish the roller with paint. My next job tonight? Trawl e-bay for a bigger ladder!

do it yourself blog eiydecoratingdame.wordpress.com My mornings work

My mornings work.....